Manage Students
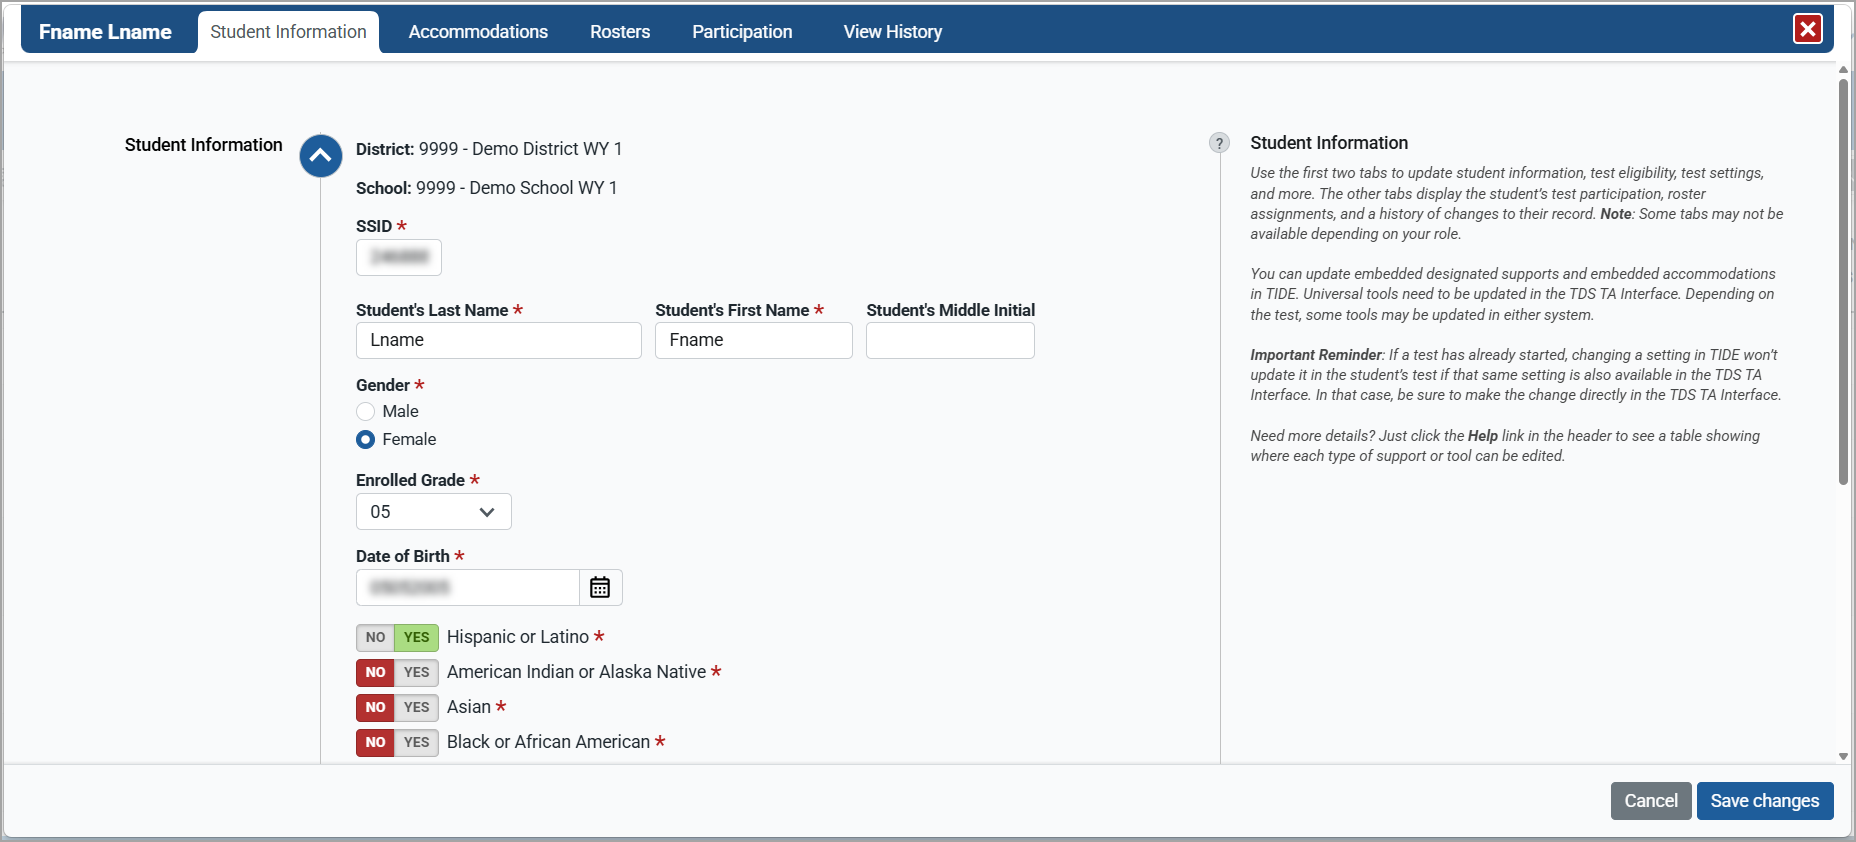
You can view and edit information about a student’s record on the student details page.
This topic contains information specific to editing student records. For basic information about editing records, you can review Add and Edit Records.
For instructions to view changes made to a student's record, review the Viewing Student Account Updates section.
Figure 26: Student Details Page

Tip: Be sure to check out the quick help on the right side of the page for useful information!
Actions Related to Other Features
There are specific actions you can take on the student details page that are related to other features and are reviewed in other topics:
Family Portal
You can find information on actions specific to the Family Portal in Family Portal Access. These actions include downloading the access codes template, printing access codes, and resetting codes.
Test Access Materials
You can find information on QR Codes and Test Tickets in Print Test Access Materials. These actions include creating, printing, and voiding QR Codes, as well as printing test tickets.
Before You Edit a Student
The information below is specific to the tasks for student records and can help you when working with student records.
Can You Edit a Student?
This task is limited to certain user roles as described in the section Understand User Roles and Permissions.
To edit a student, you must be associated with the same institutions as the student. For example, complex-level users can edit students in any school within their complex, while school-level users only have the ability to edit students in their school.
Search for the Student
Before you can view or edit a student record, you’ll need to search for the student or group of students. For information about the search process, you can review Search for Records. The information covered in this topic is specific to student tasks.
What's Unique about the Student Search Grid?
There are several features that are special to the students search grid, including the ability to change the view of the grid, to customize the visual aspects of the grid, and the ability to rearrange, hide, or show columns. You can review Customize Search Results Grids for more information about these features.
What's Unique about the Edit Student Details Page?
Tabs
When you add a student, you'll work across horizontal tabs to enter information.
The Student Information tab has student identifying information, school program designations, test eligibility and formats, and more.
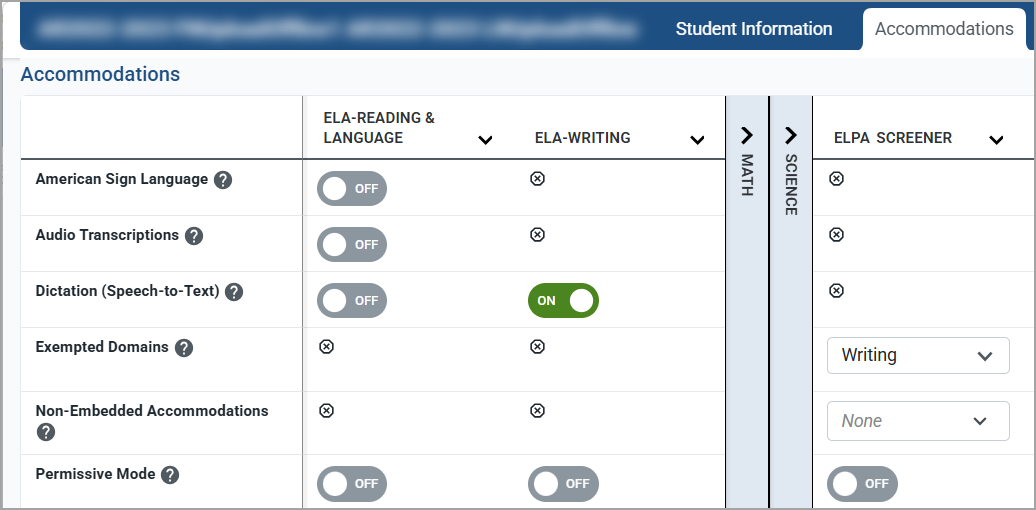
The Accommodations tab has test settings and tools that are used when students test in the Test Delivery System (TDS).
The Rosters tab shows all active rosters that include the student, when available.
The Participations tab shows tests the student participated in, when available.
The View History tab shows a history of changes made to the student's record. You can review the last section in this topic for more information.
Ribbons
As you work through the Student Information sections, you'll access ribbons–or vertical tabs–to enter information that repeats across tests, for example. The ribbons can be used in different ways across the tab, though.
Figure 27: Ribbon for Eligibility Categories

Focus Panels
On the Accommodations tab, the columns can be hidden by selecting the column headers. This activates the focus panels, making it easier to work on settings for specific tests. Select the focus panel arrow or text to show the column.
Figure 28: Focus Panels Hiding Math and Science Content

View and Edit a Student's Details Page
1.From the Students task group, select Manage. The Manage Students page appears.
2.Search for the student. For information about the search process, you can review Search for Records.
3.To open the record for editing, select (do not right-click) the Row Actions menu button  and then choose Edit. You can also select the student's name. The student details page appears.
4.Edit the record as needed. However, you may not be able to change key identifying information for the student.
If you need to know more about the settings for this type of record, you can review additional information on the uploads task: Upload Students.
Tip: Only the Student Information and Accommodations tabs have information that can be edited.
Warning: Changing a test setting in TIDE after the test starts does not update the student’s test setting if the same test setting is available in the TDS TA Interface. In this case, you must change the test setting in the TDS TA Interface.
You can review the test settings that need to be set in TIDE and those that need to be set in TDS: TIDE and TDS Accommodations Table
5.Then, you can save the record or discard your changes.
a.Select Save Changes to keep the information.
A pop-up displays to let you know the student’s record has been edited.
i.If you are finished editing students, select Dashboard.
ii.To return to the search results, select Continue.
b.Select Cancel to discard the changes.
If you select Cancel, the record will not be updated.
Viewing Student Account Updates
The View Student History feature provides detailed information on updates made to a student’s account by both TIDE users and automated processes. The information includes active and inactive statuses for the changes and the user’s name or process that initiated the change.
You can view a history of:
• Recent Changes
• Student Information and Test Settings
• Enrollment and Rosters
• Test Eligibility
Each user role can only access the same information in the history as the user role has access to in the student information screens. The history only displays a limited time frame. So, the entire student update history is not shown. All times shown are displayed in US Eastern Time (ET).
Note: When a student is deleted, you won’t have access to the View Student History feature for that student because inactive students do not display in TIDE.
-
From a student's details page, select the View History tab.
-
Review the Recent Changes for an overview of all changes or select another tab to view only those changes.
The Status column indicates whether the specified attribute value is currently active or inactive, and the When column indicates when the value was set. -
Optional: Use the filters and search options to limit the information shown in the history.
-
Optional: Clear the Include Blank Values checkbox to remove cells with no data. These cells show No Selected Value indicating that no selections are active.
-
Optional: Export data from any tab using
 .
.